单元测试是书写组件库必备的,在React中常见的测试库有2个,一个是Enzyme,一个是react-testing-library。
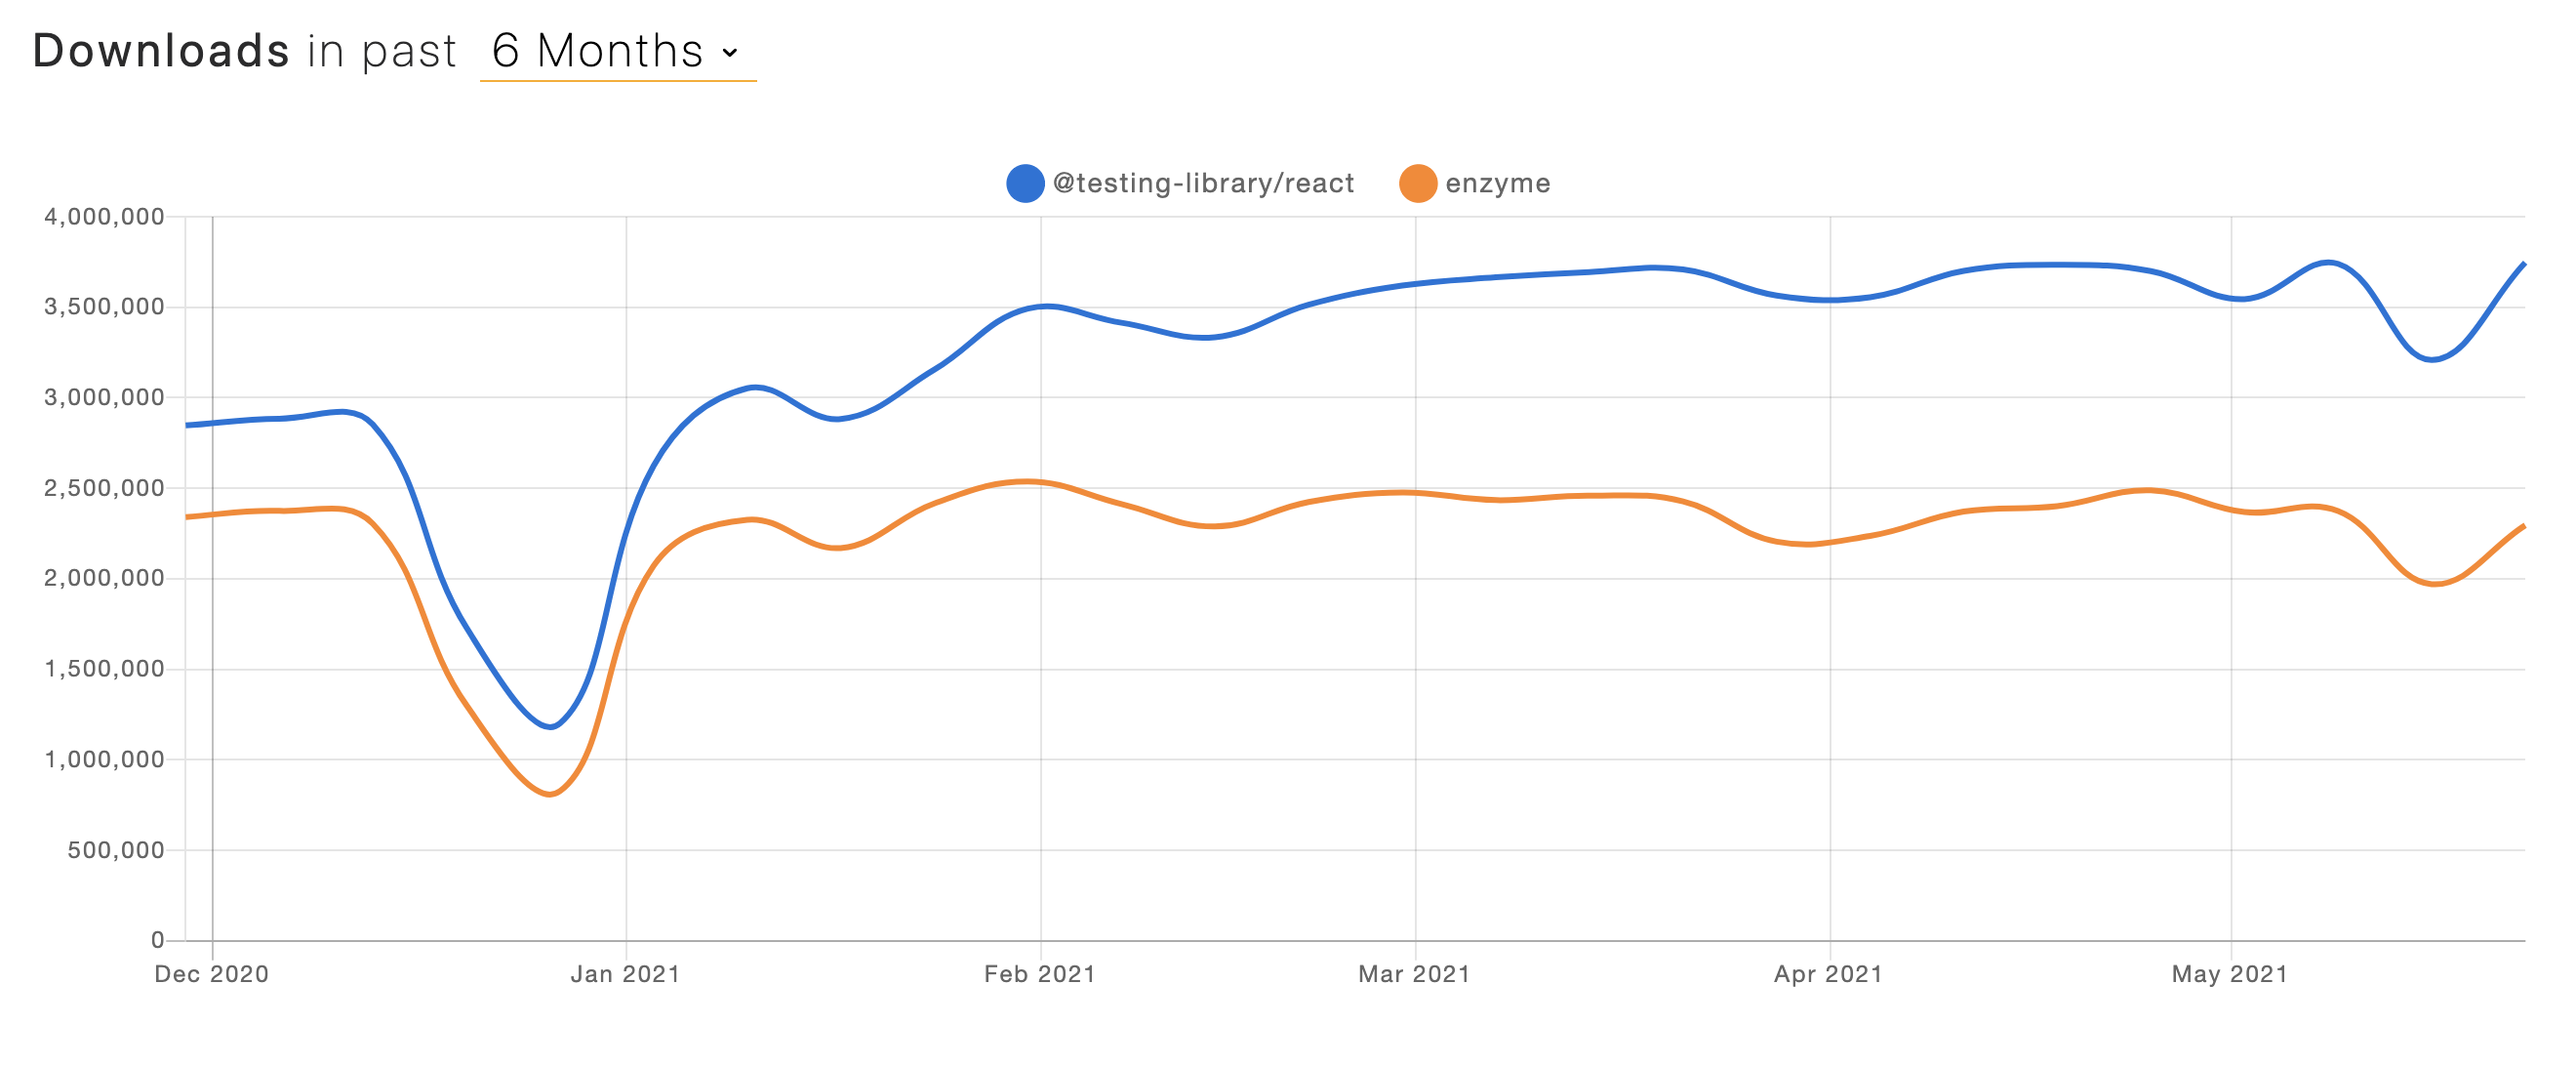
从下载量来看react-testing-library更高一点,并且react-testing-library在React v17的兼容性也会更好一些,所以本文选择使用react-testing-library。
本文分为两部分。
- 第一部分为安装和配置。
- 第二部分为常见用例的示例。
测试框架本文选择Jest。
Jest安装
测试库需要在测试框架上运行,所以需要先安装Jest。
安装Jest
npm install --save-dev jest默认情况下Jest只能使用CommonJS来导入导出,所以需要再安装babel,这样Jest就支持ESM的语法了,同时也可以解析JSX语法。
安装babel
npm install --save-dev @babel/core @babel/preset-env @babel/preset-react在根目录创建babel配置文件babel.config.js。
module.exports = {
  presets: [
    ["@babel/preset-env", { targets: { node: "current" } }],
    "@babel/preset-react",
  ],
};@babel/preset-react是因为我们需要babel来解析JSX语法,如果你想用TypeScript来写测试用例,则需要安装@babel/preset-typescript。
添加测试文件
测试文件默认需要包含.test.js,我们创建在tests目录创建一个测试文件index.test.js。
// tests/index.test.js
import React from "react";

describe("test", () => {
  test("equal", () => {
    expect(<div />).toEqual(<div />);
  });
});
随便写一个测试用例。
执行jest命令。
jestjest命令会测试所有匹配规则的文件。
jest tests/index.test.js也可以指定某一个文件。
Jest简要教程
如果你不会使用Jest,这里就简单介绍一下平时使用的方法。
describe
describe用来包含一块测试的代码,通常用它来对几个测试进行分组,它也可以自己嵌套多层的,
describe("test", () => {
  // x x x
  describe("group", () => {
  	// x x x
  });
});
test
test则是每一个测试,内部包含需要测试的方法,它的别名函数为it,它们是等效的。
test("test", () => {
  expect(1).toBe(1)
});它可以写在describe里也可以写在外面。
expect
expect翻译为预期,它需要和很多匹配器结合使用,如上面的toBe匹配器。
expect(1).toBe(1)这个测试用语言表达就是期望1的值应该为1,toBe默认是直接比较,如果想判断对象是否相等需要用toEqual。
toBeCalled
toBeCalled用例匹配函数是否被调用,通常用来测试传入组件的事件。
test("onClick", () => {
  const fn = jest.fn()
  const btn = <button onClick={fn}>button</button>
  // 点击btn
  expect(fn).toBeCalled()
});传入的测试函数需要使用jest.fn()创建。
toBeTruthy 和 toBeFalsy
和名字一样,用来判断值的真假。
not
如果我们想要测试的是“2 的值不为 1”,就可以用not。
expect(2).not.toBe(1)有个基础概念后,就可以直接写代码了,写的同时就可以学习更多的匹配器。
React Testing Library 安装
虽然它的名字叫React Testing Library,但是它的包名叫@testing-library/react。
npm install --save-dev @testing-library/react @testing-library/jest-dom@testing-library/jest-dom添加了一些额外的匹配器,用来测试dom。
需要将它加入jest的配置,同时将jest环境设置为jsdom。
在根目录创建jest的配置文件jest.config.js。
module.exports = {
  setupFilesAfterEnv: ["@testing-library/jest-dom"],
  testEnvironment: "jsdom",
};现在我们的测试环境就能测试React代码了。
import React from "react";
import { render } from "@testing-library/react";

test("component", () => {
  const { getByLabelText } = render(<button aria-label="Button" />);
  expect(getByLabelText("Button")).toBeEmptyDOMElement();
});运行jest命令试试~
@testing-library/react的使用这里先不赘述,后面看代码实践一步一步就会了。
接下来将常见的测试用例分享给大家。
常见的测试用例
常见的测试用例一般就是模拟用户的操作,然后判断是否符合预期结果。
测试<button/>点击
通常我们无法判断按钮是否被点击,所以都是通过模拟用户点击后,按钮的点击事件是否被调用来判断的。
import React from "react";
import { render, fireEvent } from "@testing-library/react";

test("component", () => {
  const onClick = jest.fn(); // 测试函数
  // render 用来渲染元素
  const { getByLabelText } = render(
    <button aria-label="Button" onClick={onClick} />
  );
  // getByLabelText 可以通过aria-label的值来获取元素
  const btn = getByLabelText("Button");
  fireEvent.click(btn); // 模拟点击事件
  expect(onClick).toBeCalled(); // 期望被调用
  expect(onClick).toBeCalledTimes(1); // 期望被调用一次
});
测试<input/>的值和输入
我们需要模拟change事件来改变输入框的值。
test("输入框输入,校验值", () => {
  const onChange = jest.fn();
  const { getByTestId } = render(
    <input data-testid="input" onChange={onChange} />
  );
  // 通过data-testid的方式来获取元素
  const input = getByTestId("input");
  // 模拟change事件,第二个参数模拟event的值
  fireEvent.change(input, { target: { value: "test" } });
  expect(onChange).toBeCalled();
  expect(input).toHaveValue("test");
});
测试元素是否被disable,是否包含某一类名
使用toBeDisabled来匹配是否disable,有时候我们会手动的控制元素的focus值,通过值来附加对应的类名,toHaveClass就可以用来匹配是否包含类名。
test("测试元素是否disabled,是否包含某一类名", () => {
  const { getByText } = render(
    <button disabled className="button-disabled">
      this is a button
    </button>
  );
  // getByText从text来获取元素
  const btn = getByText("this is a button");
  expect(btn).toBeDisabled();
  expect(btn).toHaveClass("button-disabled");
});
测试props改变对元素是否生效
在@testing-library/react中需要使用rerender方法来改变props,toHaveTextContent来匹配textContent。
test("测试props改变对元素是否生效", () => {
  const Demo = ({ loading }) => (
    <button aria-label="Button">{loading ? "loading" : "button"}</button>
  );
  const { getByLabelText, rerender } = render(<Demo />);
  const btn = getByLabelText("Button");
  expect(btn).toHaveTextContent("button");
  // 通过rerender来模拟props对改变
  rerender(<Demo loading />);
  expect(btn).toHaveTextContent("loading");
});
测试子元素是否包含某一类名
有时候会通过受控值为子元素添加类名,可以用getElementsByClassName通过类名获取子元素,应用场景可以是判断下拉框是否有开启到类名,或者列表是否存在被选择元素的类名。
test("测试子元素是否包含某一类名", () => {
  const Demo = ({ loading }) => (
    <button aria-label="Button">
      <span className={loading ? "loading" : "button"}>button</span>
    </button>
  );
  const { baseElement } = render(<Demo loading />);
  const ele = baseElement.getElementsByClassName("loading");
  expect(ele.length).toBe(1);
});
测试异步调用事件
如果事件是包含在异步方法里,则需要使用waitFor来测试。
toBeCalledWith匹配器用来测试事件调用是否传入相应的参数。
test("测试异步事件", async () => {
  const Demo = ({ onClick }) => {
    const asyncClick = async () => {
      await Promise.resolve();
      onClick("click");
    };
    return <button onClick={asyncClick}>button</button>;
  };
  const fn = jest.fn();
  const { getByText } = render(<Demo onClick={fn} />);
  const btn = getByText("button");
  fireEvent.click(btn);
  await waitFor(() => expect(fn).toBeCalledWith("click"));
});
测试定时器
如果代码里包含某一定时器,可以使用jest对应的api来快进时间。
除了runAllTimers,常用的还有runOnlyPendingTimers。
test("测试定时器", () => {
  jest.useFakeTimers(); // 使用fakeTimer
  const Demo = ({ onClick }) => {
    const waitClick = () => {
      setTimeout(() => {
        onClick();
      }, 10000);
    };
    return <button onClick={waitClick}>button</button>;
  };
  const fn = jest.fn();
  const { getByText } = render(<Demo onClick={fn} />);
  const btn = getByText("button");
  fireEvent.click(btn);
  jest.runAllTimers(); // 执行所有timer
  expect(fn).toBeCalled();
  jest.useRealTimers(); // 使用realTimer
});
snapshot的测试
snapshot可以直接对比组件是否有变化,如果组件有变化,就不匹配snapshot,在确定组件没有问题后,就需要执行jest -u来更新snapshot。
test("snapshot 测试", () => {
  const Demo = () => (
    <form>
      <input name="test" type="text" />
      <button type="submit">submit</button>
    </form>
  );
  const { asFragment } = render(<Demo />);
  expect(asFragment()).toMatchSnapshot();
});
Hooks的测试
hooks的测试需要安装另一个包。
npm install --save-dev @testing-library/react-hooks基本测试
import React from "react";
import { render, waitFor } from "@testing-library/react";
import { renderHook } from "@testing-library/react-hooks";

test("Hooks 测试", () => {
  const useCounter = () => {
    const [count, setCount] = React.useState(0);
    const increment = React.useCallback(() => setCount((x) => x + 1), []);
    return { count, increment };
  };
  const { result } = renderHook(() => useCounter());
  // result.current 包含hooks的返回值
  expect(result.current.count).toBe(0);
  // result.current.increment()的调用需要放在waitFor里
  waitFor(() => result.current.increment());
  expect(result.current.count).toBe(1);
});
异步Hooks测试
异步hooks测试提供了一个等待函数waitForNextUpdate,默认等待1000毫秒,可以通过传递参数来修改。
test("异步 Hooks 测试", async () => {
  const useCounter = () => {
    const [count, setCount] = React.useState(0);
    const incrementAsync = React.useCallback(
      () => setTimeout(() => setCount((x) => x + 1), 100),
      []
    );
    return { count, incrementAsync };
  };

  const { result, waitForNextUpdate } = renderHook(() => useCounter());
  result.current.incrementAsync();
  // waitForNextUpdate等待下一次更新,默认会等待1000毫秒
  await waitForNextUpdate();
  expect(result.current.count).toBe(1);
});先写这几个常见的用例,代码仓库。